You can read my blog for writing the service I will use.
For the necessary installations to write Fiori with Vs Code, you can read my blog.
Open an empty folder and type ‘open’ in the terminal. You can also say ‘Open with Visual Studio Code’

Writed Code .

I press CTRL + Shift + P to open the Fiori Generator

We select ‘SAP UI5 Freestyle’ and ‘SAP UI5 Application’ and click ‘Next’.

Here, I select ‘Connect to a System’ and click on ‘New System’, then choose ‘ABAP On Premise’

To learn the URL,
we right-click on Favorites in the SAP Easy Access menu and select ‘Add Other Objects’

We add the ‘/UI2/FLP’ transaction code and execute it.
Here, our Fiori link appears in Internet Explorer

Here, we paste the part before ‘/sap’ into the URL field. We select the Client, User, and Password, and then press the Login button.

From here, we select our service and click ‘Next’.

Then we press ‘Next’.

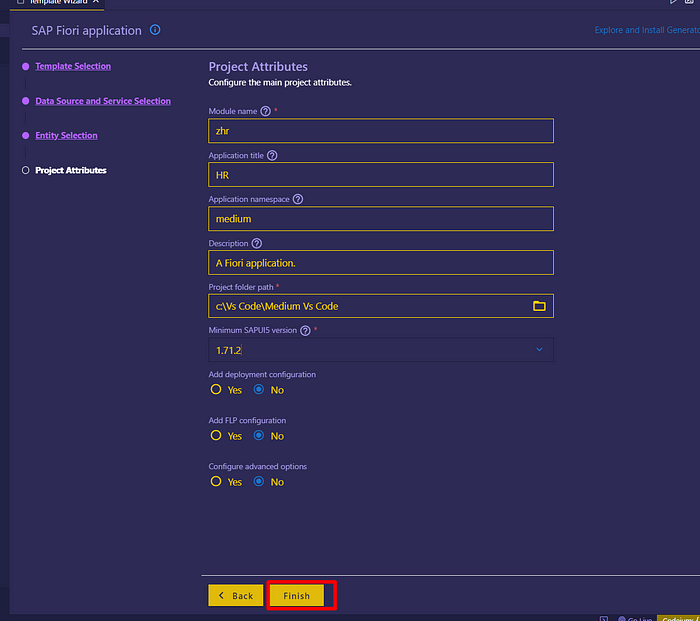
Here, we give it the name ‘main’ and click ‘Next’.

In the Fiori launchpad, we type ‘sap.ui.version’ in the console to find out which Fiori version we are using.

Then, we select the same or closest version number as the ‘UI5 version’ and give a name to our project, then click ‘Finish’
In Visual Studio Code, we click on ‘Open Folder’.

Then, we select our project named ‘zhr’ and click on ‘Select Folder’

By pressing CTRL + T or clicking on the Terminal button, we open our terminal and type ‘npm start’.

To test if our service is coming through, after clicking on ‘Inspect’, we go to the ‘Network’ section and search for ‘metadata’, then refresh the page

As you can see, the Metadata is now within my project.

No Comments