To write EntitySeti, you can refer to this blog.
To connect this blog to Visual Studio, you can read this blog.
To check if the data is coming or not, I’m binding an Entity Set and its properties from my Entity Set to a simple sap.m table in the mainview.xml file.
Here, in the items section of the table, I bound the EntitySet from the Default model, which is “”.
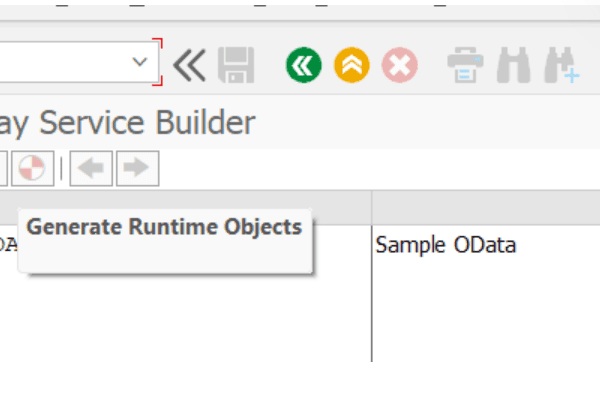
We can see the name of the EntitySet from here.

If we go to the manifest.json, we will see that the default model has a datasource named “MainService” which automatically creates an OData service containing our service.


Therefore, when binding, I can directly use the property names from the service.
<content >
<Table id="idPersonalTable"


inset="false"
items="{/HRSet}">
<headerToolbar>
<OverflowToolbar>
<content>
<Title text="Personal Datas" level="H2"/>
<ToolbarSpacer />

</content>
</OverflowToolbar>
</headerToolbar>
<columns>
<Column width="12em">
<Text text="Personal No " />
</Column>
<Column width="12em">
<Text text="Name " />
</Column>
<Column width="12em">
<Text text="Surname" />
</Column>
<Column width="12em">
<Text text="Birth Place" />
</Column>
</columns>
<items>
<ColumnListItem vAlign="Middle" type="Active">
<cells>
<Text text="{Pernr}"/>
<Text text="{Nachn}"/>
<Text text="{Vorna}"/>
<Text text="{Gbort}"/>
</cells>
</ColumnListItem>
</items>
</Table>
</content>
As you can see, my data has arrived. The “Gbort” field, which represents the place of birth, is empty in the SAP tables as well, so it is showing up as empty.

If you open the inspection mode with F12 and type “batch” in the network tab, then refresh, you will be able to see the invocation of our service and its details in the payload section of the batch

If you copy the data from the response section and paste it into the Jsonlint website for conversion, you can also access the data in its JSON format.


To execute a function after the table data is populated, you can write a function in the updateFinished event of the table in the mainview.xml file.
Table id="idPersonalTable"
            updateFinished="onTableUpdateFinish"
To be able to debug and check the execution of the function, you can add a console.log statement inside the updateFinished function in the Controller.js file.
onTableUpdateFinish : function(oEvent){
console.log ("debug");
            },
After that, we add a debug pointer and refresh the application.


Here, using oEvent.getSource(), we can access the source of the event, which is the table itself. Then, by using getItems(), we can access the data of this table. Afterwards, we can access the cells of the first element (index 0) in the array and retrieve their text. In our example, this could be the employee number. By modifying the array of cells, we can access other data in the table in a similar manner.

After that, in the mainview.xml, I bind the function that will be executed after a selection change in the table.
To ensure that the selection appears in this way, we choose the SingleSelectMaster mode.

<Table id="idPersonalTable"
            selectionChange="onSelectionChange"
            mode="SingleSelectMaster"
To be able to debug and capture the event, you can add a console.log statement in the SelectionChange function with the oEvent parameter. This will allow you to log and examine the event details during the debugging process.
onSelectionChange: function(oEvent){
console.log(oEvent)
  },
After that, you can place a debug pointer in the Source section and select a data from the table. This will trigger the SelectionChange function and pause the debugger at the specified debug pointer, allowing you to inspect the event and its source in the debugging process.


Here, we can retrieve the path of the selected context’s first array element from the Source of oEvent. This allows us to access the path of the selected item in the table.

In the manifest.json file, we defined the main model.
 "main": {
        "type": "sap.ui.model.json.JSONModel"
       },
After that, using the oEvent parameter, we created a variable called table by accessing the source of oEvent. Then, we assigned the path of the selected context’s first array element to a variable called Path.
Next, we accessed the default model from oModel using the sPath property to create a variable called RowData.
Then, we accessed the main model from oMainModel and set the data from oRowData to the Personal property.
 onSelectionChange: function(oEvent){
var oTable = oEvent.getSource();
var sPath = oTable.getSelectedContexts()[0].getPath();
var oModel = this.getView().getModel();
var oRowData =oModel.getProperty(sPath);
var oMainModel = this.getView().getModel("main");
              oMainModel.setProperty("/Personal",  oRowData);

                    },
After that, you can add a text element to the OverflowToolbar and bind it to main>/Personal/PropertyName where you have formatted it as the name of the property in the Entity Set. By doing this, when you select a person’s data in the table, their name will be displayed above the screen as the value of the Personal property that you previously set.
<OverflowToolbar>
<content>
<Title text="Personal Datas" level="H2"/>

<ToolbarSpacer />
<Text text="{main>/Personal/Vorna}"/>
</content>
</OverflowToolbar>

You can access the entire code you have written here.
https://github.com/kaancancalkan/Medium-Blog/tree/main/Medium%20Vs%20Code/zhr

No Comments